


Step-By-Step DIY Clock Movement Replacement Guide
Author: Erin Crisci Date Posted:24 April 2022
A comprehensive step by step guide to replacing a quartz clock movement.
Please note: If you have a mechanical clock, a battery chiming clock, a battery pendulum clock, a time & tide clock or a tide clock then this guide is not for you. If you do hae a chiming or battery pendulum clock, the method to measure the shaft length and hands generally remains the same, however we don't cover these movements specifically in this guide.
We cannot guarantee your hands will suit our movements. Please read through the guide carefully and gather all relevant information before making a purchase.
Want a checklist to help you find the right part? Follow the link here: Replacement Quartz Movement Checklist
Overview:
- Removing your old movement from your clock
- Identifying what type of movement you have by measuring both the hand size/shape as well as the shaft length of the movement
- Ordering replacement products online
- Reassembling your clock
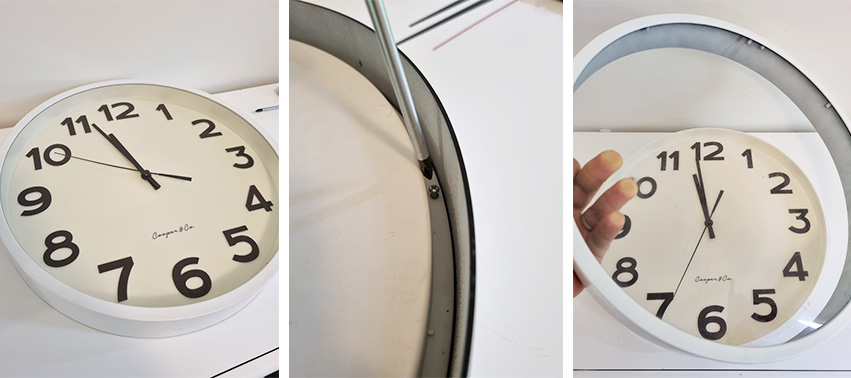
Step 1: Remove Your Old Clock Movement
1. If your clock has a glass or plastic lens then remove it from your clock.
Please note: All clocks are different so the removal of the lens will differ from clock to clock.
2. If your clock has a seconds hand then remove it by gently pulling it off the shaft. To do this you carefully lift it, holding it at the centre of the hand, directly up and away from the dial. You may find your clock has a small cap instead of the second hand. This is purely for aesthetic reasons to cover the end of the shaft and can be removed the same way. Sometimes there can be corrosion or the hand becomes stuck, and you may pull the second hand shaft out of the movement with the hand.
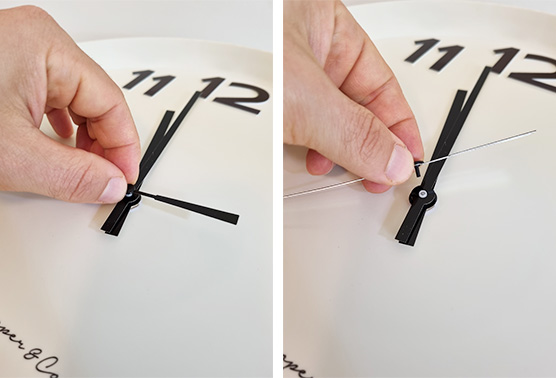
3. Remove your minute hand:
Look carefully to determine if your clock has a small nut that secures the minute hand. The nut can either be a closed nut (no hole in the middle) or an open nut (with a hole like a donut). Regardless of which type, unscrew this nut to release the minute hand.
If your clock does not have a small nut then your minute hand is a friction fit (press fit). Remove the minute hand by gently lifting it off the shaft.
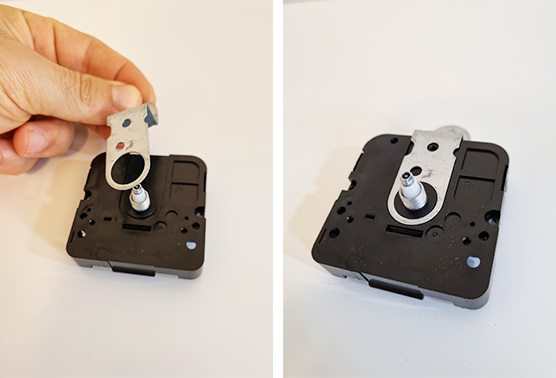
4. Remove the hour hand by gently pulling it off the shaft. It is pushed on and held by friction, so it may need moving back and forth while lifting it to release it from the shaft.
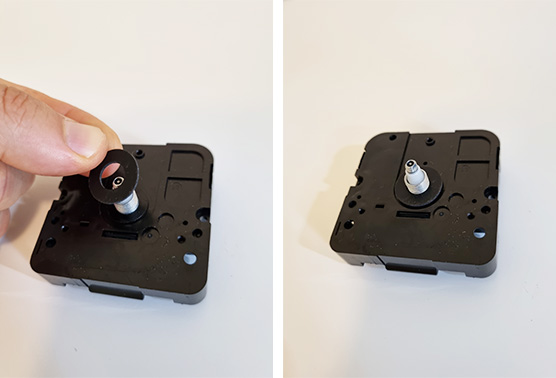
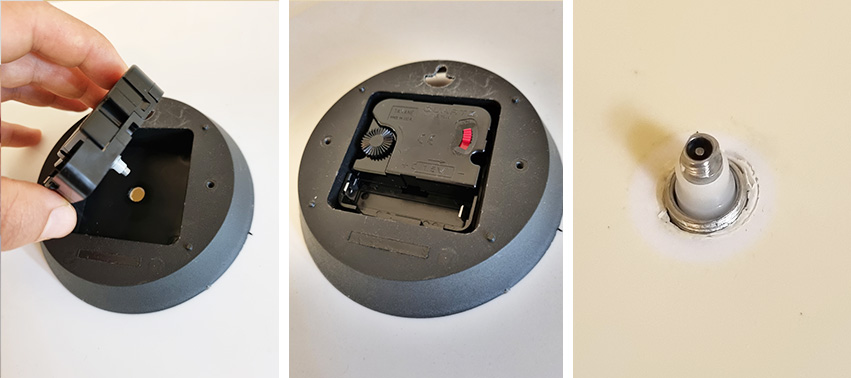
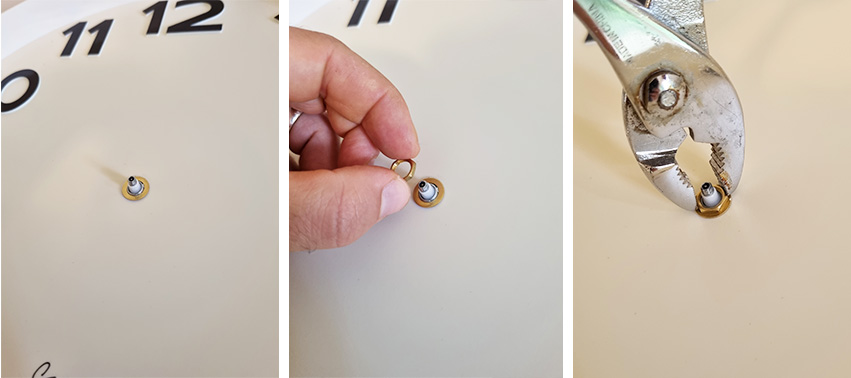
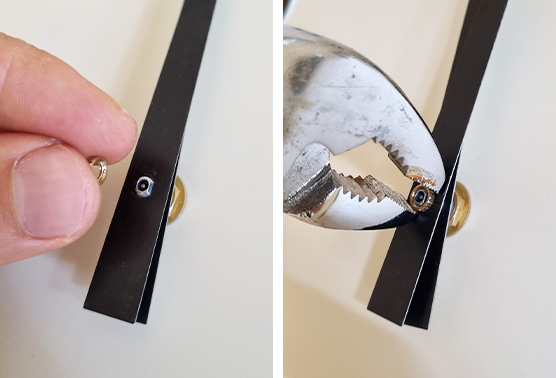
5. Unscrew the hex nut or collar nut (depending on the movement you have). Once this nut has been removed, your movement should be unsecured and simply slide out from the back of the clock. If your movement does not slide out it may be adhered to the back of your clock with tape or glue, or it may be secured with clips. In this case, you may need to work the movement with a tool in order to pry it away, or gently push on the shaft from the front of the dial to release the movement.
Step 2: Identify Your Old Movement
1. Examine And Measure Your Hands:
Measure the length of your minute hand from the centre hole to the end. If your minute hand is over 160mm in length then we strongly recommend that you use a high torque movement.
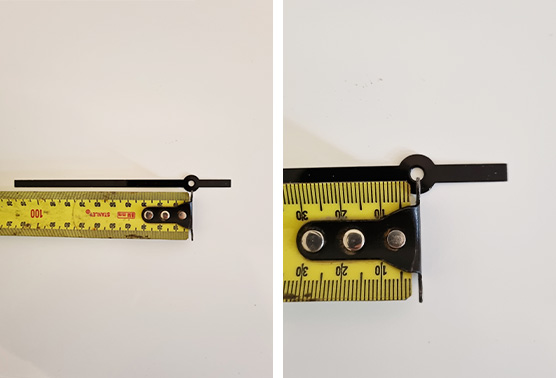
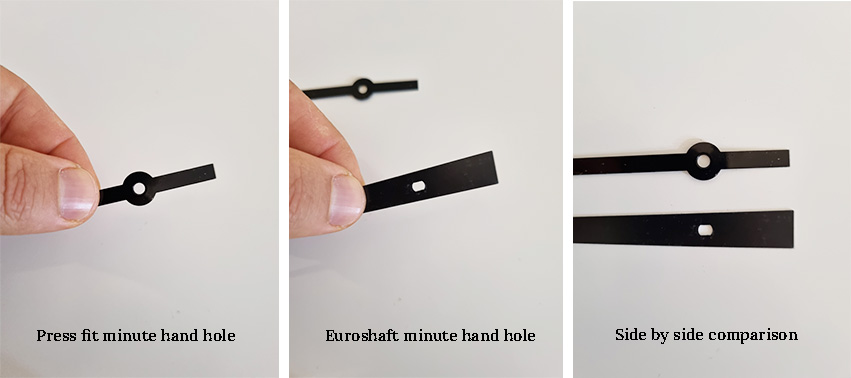
Examine the hole in your minute hand.
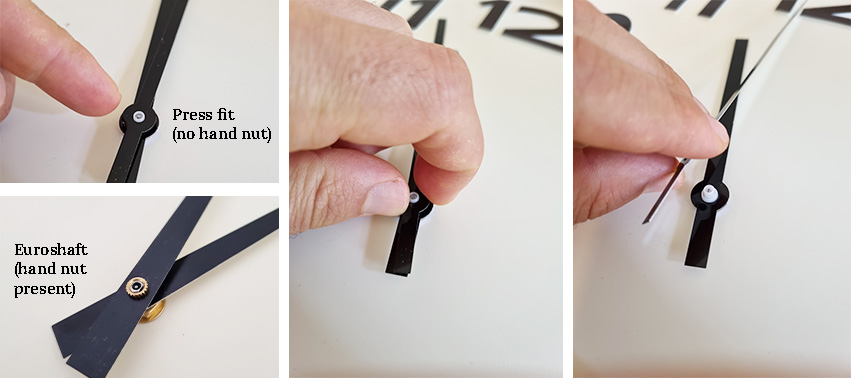
- If it is round or has a hexagonal looking eyelet, and if the hand pushes onto the shaft then your movement is a press fit movement.
- If the hole is slotted, in other words has two flat sides and round top and bottom, and it was held on with a small nut, then your movement is a euro shaft (I-shaft) movement.
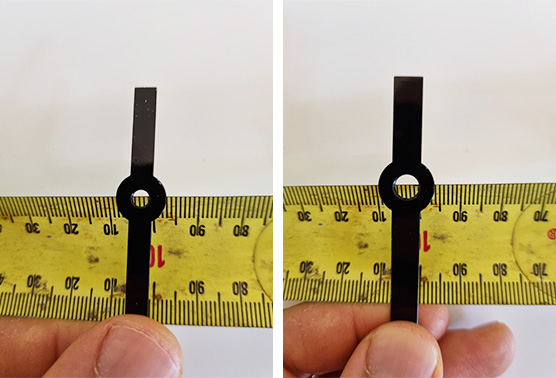
Please note: As the shaft diameter for all hands varies significantly, your original hands may not be compatible with the replacement movement that you select. It is important that you measure the shaft diameter (both the hour and minute shaft) to confirm whether it is a match, or if not you can order replacement hands that are compatible with your replacement movement.
Measure the diameter of both the minute and hour hand hole
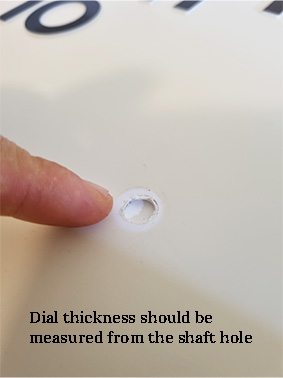
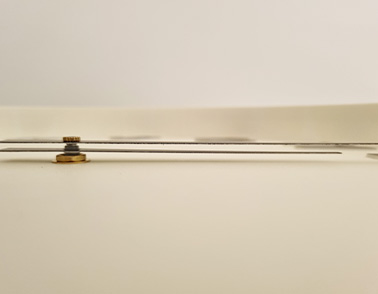
2. Measure The Shaft Length Of Your Movement
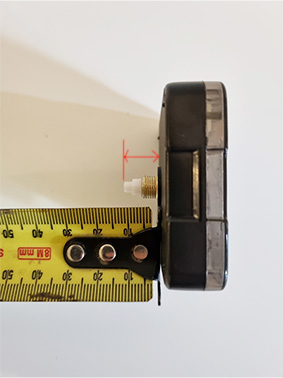
If you have a glass or plastic lens, it is critical to measure the total shaft length. If the shaft is too long, it will touch the lens. If it is too short, you may not be able to secure the movement with the hex or collar nuts provided. If your clock does not have a lens, you may need to consider a slightly longer shaft as this will provide a margin for error, this also means that the hands will simply sit further proud of the dial.
1. Ensure to measure the shaft length of your old movement by measuring from the face of the movement to the very end of the shaft. This measurement is NOT the threaded part of the shaft, it is the entire shaft. Please note it is important to get accurate measurements.
2. It will also be helpful to know the thickness of the dial, or the material that the shaft is extending through- from the back of the clock to the front. This is important as you will need to fix the movement to the dial and if you don’t get this right, the thread won’t reach through to the front and thus you wont be able to fix the hex or collar nut to the movement.
Please note: Some clocks have a recess in the back of the clock to reduce the dial thickness and allow the shaft to reach through. This needs to be considered in your selection.
Step 3: Order Your Replacement Movement Online
For New Movements:
- For press fit movements visit - https://www.clockshop.com.au/parts/movements/press-fit
- For euro shaft movements visit - https://www.clockshop.com.au/parts/movements/euro-shaft/
- For high torque movements visit - https://www.clockshop.com.au/parts/movements/high-torque/
For New Hands:
- For press fit hands visit - https://www.clockshop.com.au/parts/press-fit-hands/
- For euro shaft hands with a minute hand eyelet dimensions of 4mm x 3mm (takane) visit - https://www.clockshop.com.au/parts/takane-hands/
- For euro shaft hands with a minute hand eyelet dimensions of 3.5mm x 2.8mm (German Quartz) visit - https://www.clockshop.com.au/parts/german-fit-hands/
- For high torque hands visit - https://www.clockshop.com.au/parts/clock-hands/high-torque/
Step 4: Reassemble Your Clock
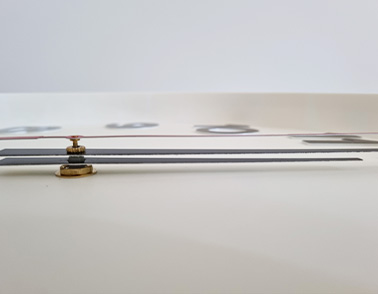
1. If your clock requires a metal hanger then this needs to be placed over the shaft or inserted into the movement housing first.
2. Place the rubber washer onto the shaft of your new movement.
3. Insert your new movement into the clock from the back of the dial holding it in position.
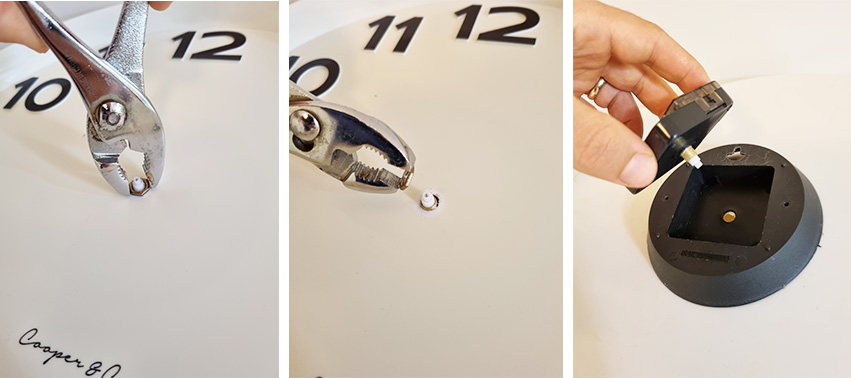
4. Place the brass washer and hex nut/ brass collar nut onto the shaft and tighten it with one of these recommended tools:
- For hex nuts use a pair of pliers
- For brass collars use a wide flat head screwdriver
Please note: Do not overtighten the hex nut or brass collar as this may damage your new movement. The nut should be secure but not forced tight.
5. Confirm your movement is tight and aligned correctly. If not, make the necessary adjustments and re-tighten.
Now it is time to install the hands. Be careful not to mark the dial of the clock and be sure to use gentle force so as to not bend the hands unnecessarily. The hands can be straightened if you find they have been slightly bent during installation.
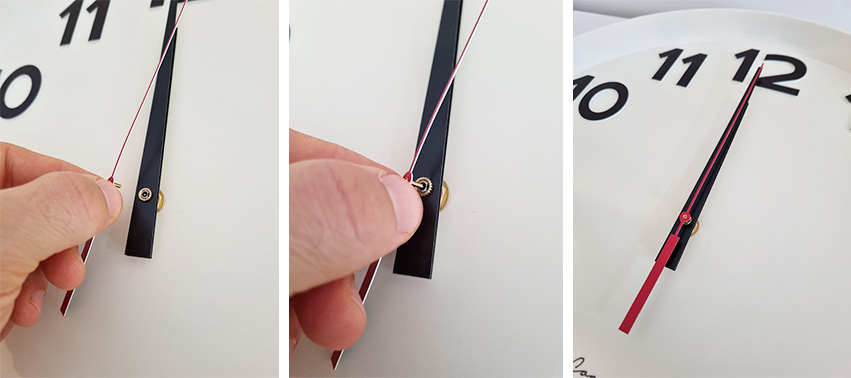
6. Push the hour hand onto the shaft, ensuring it is pointing straight up to the 12 position.
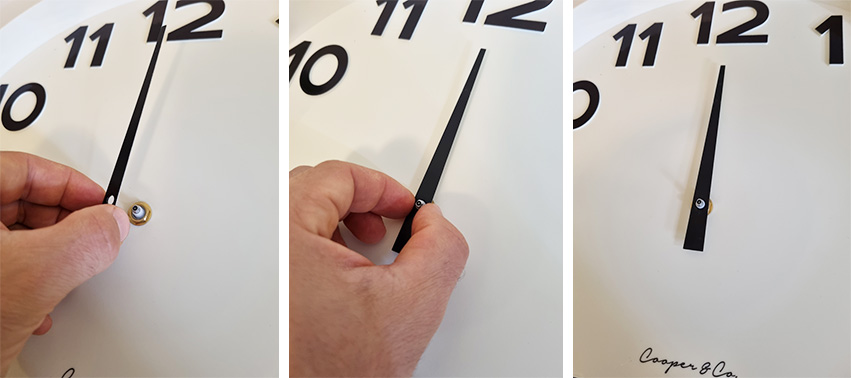
7. Ensure the hour hand is parallel with the dial.

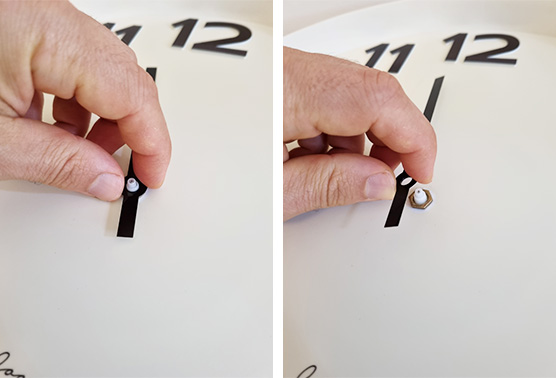
8. Secure the minute hand to the shaft, also lining it up to the 12 position:
- For press fit - Push the minute hand onto the shaft.
- For Euro shaft - Place the minute hand onto the small threaded end of the shaft. If you find that the hand is pointing away from the 12, you have to move the hand around to the 12 position after lining up the slotted hole, and so you may need to adjust the hour hand back to the 12 position also.
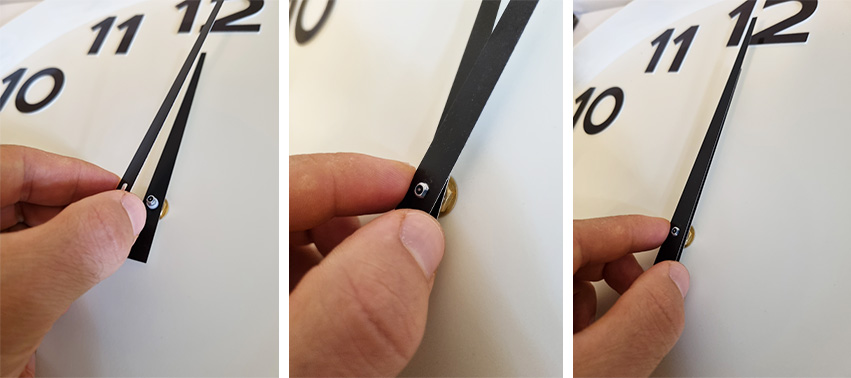
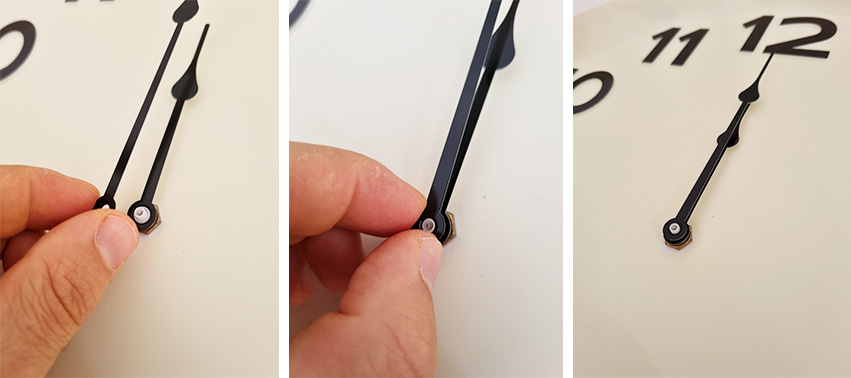
9. Once in position, secure the hand with the small hand nut. Note, if you wish to use a seconds hand on the clock you will need to use an open hand nut (with a hole in the centre). Some movements include a closed hand nut. Tighten the hand nut gently with a pair of pliers.
10. Ensure the minute hand is parallel to the hour hand and dial.
11. If your clock has a second hand or a cap / button - Push this onto the small pin shaft at the very end.
12. Ensure the second hand is parallel with the hour hand, minute hand and dial.
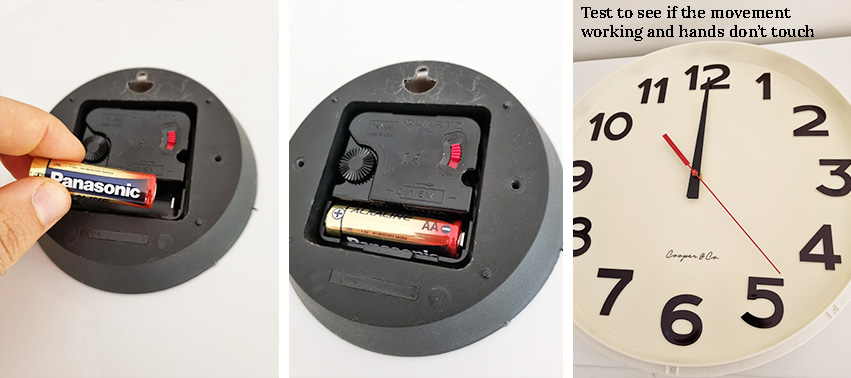
13. Insert a battery (we recommend Panasonic or Duracell) into the movement, run the clock and check the hands are all parallel and not touching each other or the dial.
14. If your clock has a glass/plastic lens, secure the lens to the clock checking that the second hand is not touching the lens.
Congratulations! You have now successfully replaced your clock movement.
We hope this guide has helped you remove, identify, order and replace the movement in your clock. We have also filmed a supplementray video which guides you through changing your clock's movement which you can view below: